¶ Getting started with Script Extender
This tutorial covers the absolute basics for modders to start writing mods with Norbytes Script Extender.
No prior knowledge about programming is required; however, please familiarize yourself with how to install mods and Script Extender:
After reading this guide, feel free to look at the example Changing an entity’s name or follow the tutorial: Creating your First SE Mod (TBA)
If you are having trouble following this guide, feel free to join the Baldur’s Gate 3 Modding Community discord linked here
The Baldur’s Gate 3 Modding Community is a community modding run discord. Keep in mind that everyone that may help you is a volunteer. Please read and follow the server rules.
You can find further information linked under 09. Useful Resources on the bottom of this page.
¶ 1. Activate the Script Extender Console
After following the guide How to install Script Extender and activating the console, ensure that the console works properly.
Launch your game and when the game exe opens, a second window will also open. When you launch the game now, you should see a second window opening. This is the Script Extender console.
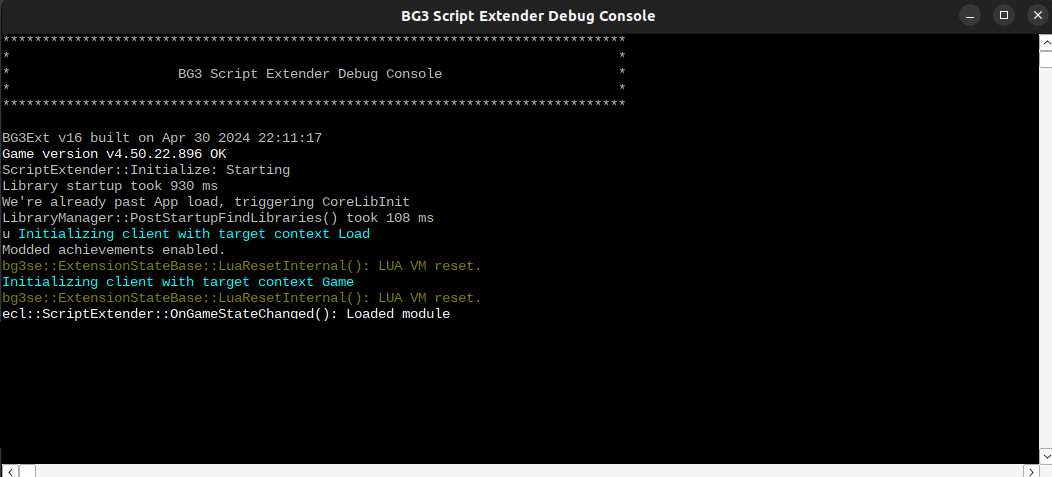
If you see this window, it means you have successfully installed SE with console.
¶ 2. Familiarizing yourself with the Script Extender Console
To familiarize yourself with the usage of the SE console you can execute a few simple commands.
These can all be found in the 09.Useful Resources at the bottom of this tutorial as Osi functions .
¶ 2.1. Load a save
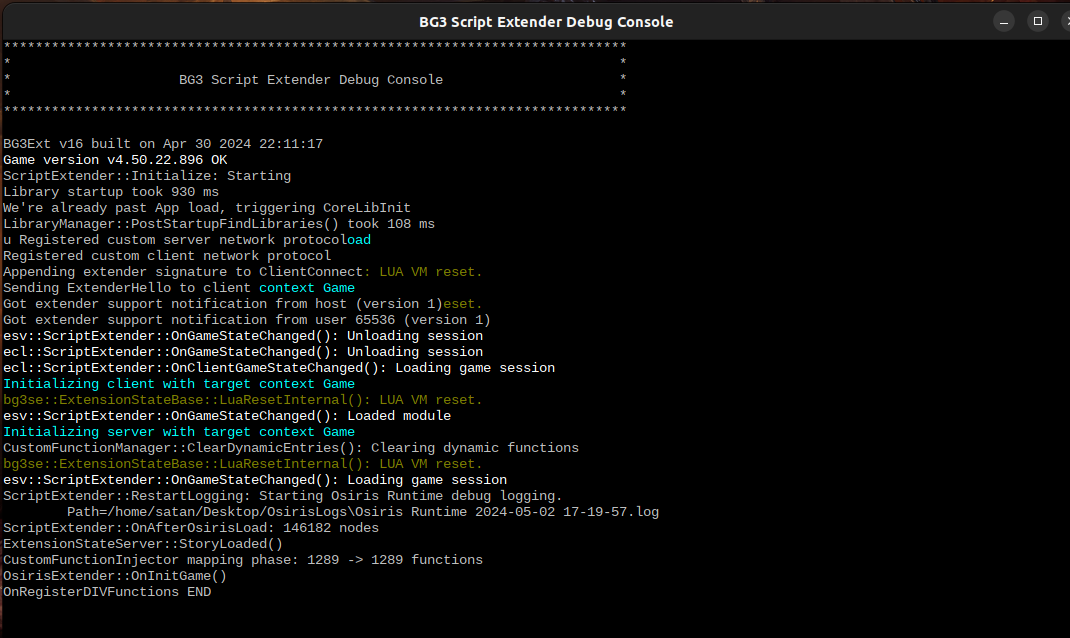
You can either start a new game or load an existing save.
When the save is loaded you should see some output in your console, telling you that the session has loaded and other debug statements depending on what kind of mods you have installed:
¶ 2.2. Activate the input
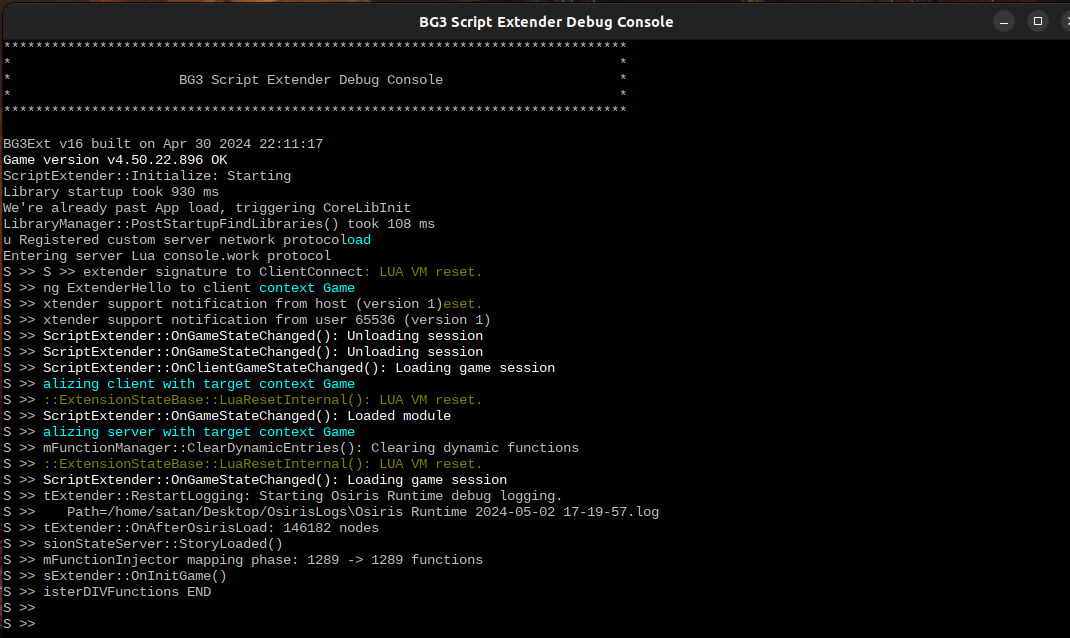
To be able to input commands into the console press enter once.
If you have too much text on your console and you cannot see your input line, you can repeat this a few times until you can see the S >>
¶ 2.3. Basic inputs
Replicate the following steps to familiarize yourself with basic inputs into the SE console:
¶ 2.3.1. In the console enter the following command. This will print “Hello World” on the console:
_P(“Hello World”)
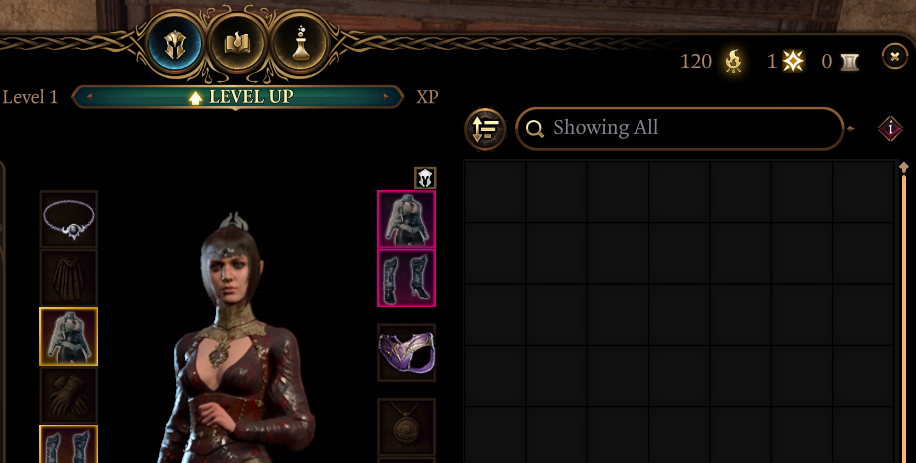
¶ 2.3.2. Add an item to your inventory - Here: 10 Bars of Soap:
TemplateAddTo("d32a68ff-3b6a-4d83-b0c4-0a2c44b93ea9", GetHostCharacter(), 10)

You will not see any print statement this time.
Instead check your characters inventory
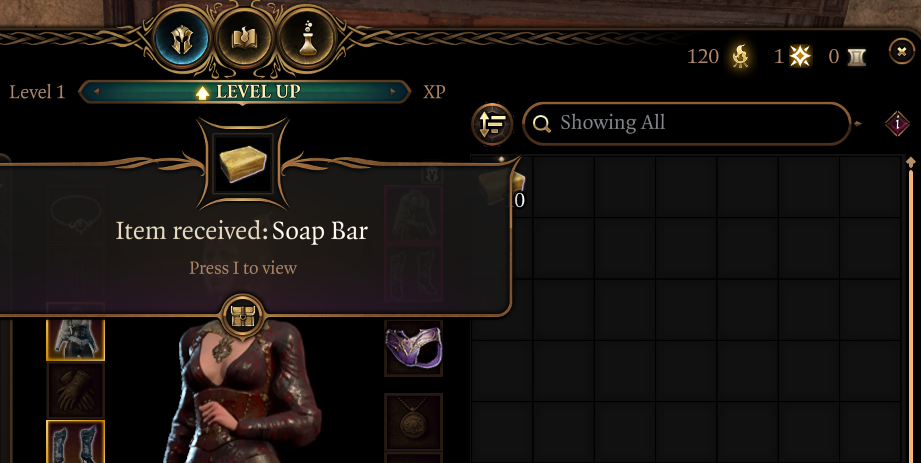
¶ 2.3.3. Get the HostCharacter uuid (the character whose portrait is activated - here: Astarion):
_P(Osi.GetHostCharacter())
This will print: c7c13742-bacd-460a-8f65-f864fe41f255 to your console
You will need this command quite often to easily access your character so it’s useful to keep it in mind!
Now that you are familiar with entering commands in the console, it is time to create your workspace
Only want to execute a few commands on the console and not interested in creating a mod?
You can stop here if you are following another guide or jump to
6.Osiris for a few examples
¶ 3. Creating your workspace
For the next steps, please close your game.
This guide uses this example workspace you can download from google drive.
Using it will make it easier to follow the tutorial.
You will also need an editor. I recommend VSCode or the Open Source alternative VSCodium:
- VSCode: https://code.visualstudio.com/
- VSCodium:https://vscodium.com/
Download the example workspace linked above and unpack/unzip it.
¶ 3.1 Opening your workspace
On Windows 11, right click the folder “MySEMod” after unzipping and click “Open with Code”.
If you did not specify in the installation of VSCode that “Open with Code”
should be added to the context menu in windows, you will not see this option.
In this case follow the steps below instead.
If you do not see that option, launch VSCode and open the unzipped workspace as a folder
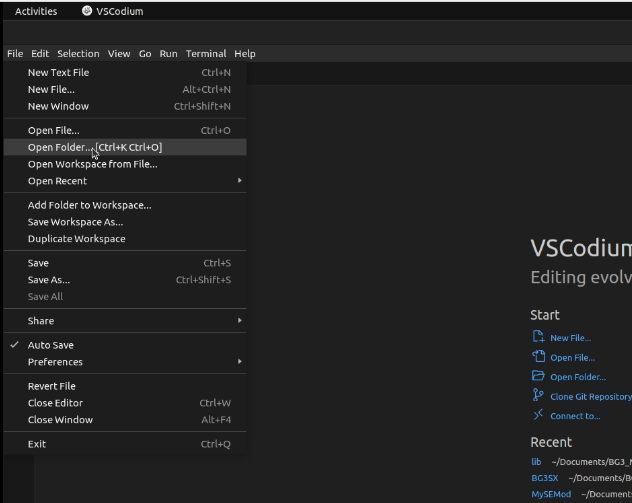
Navigate to where you saved the folder and select it
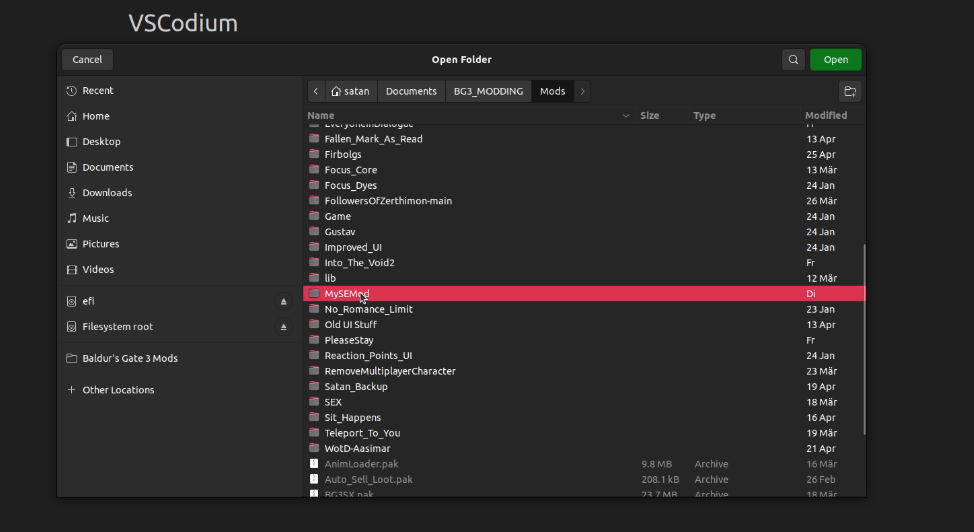
Now you should see the MYSEMOD folder in your editor. This is your workspace.
If you are planning on using this workspace as a template for a mod you want to publish
you want to change the names and handle uuid in themeta.lsxfile.
More information in Dev Environment Set-up
¶ 3.2 Installing Extensions
We will now install a few Extensions which will make creating mods a lot easier.
For this click the Extensions button on the left. This will open a tab which allows you
to see your installed Extensions and install new ones.
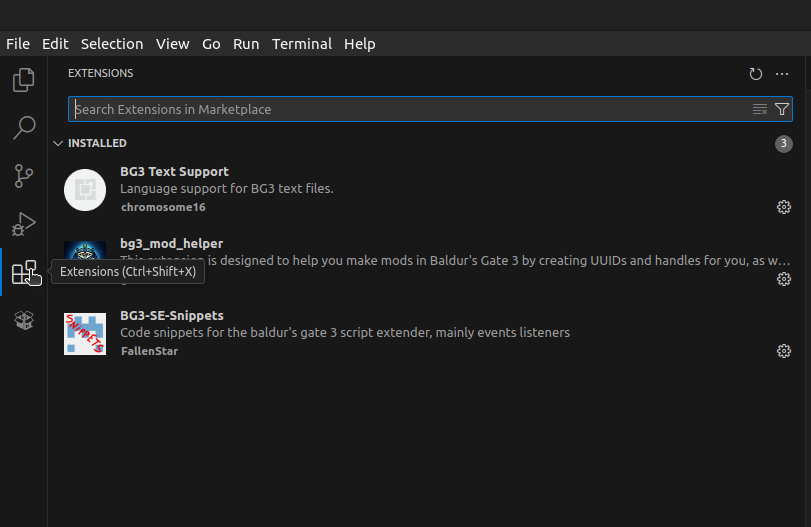
We will first install BG3 Text Support, bg3_mod_helper and BG3-SE-Snippets.
These can be installed by searching for them in the search bar.
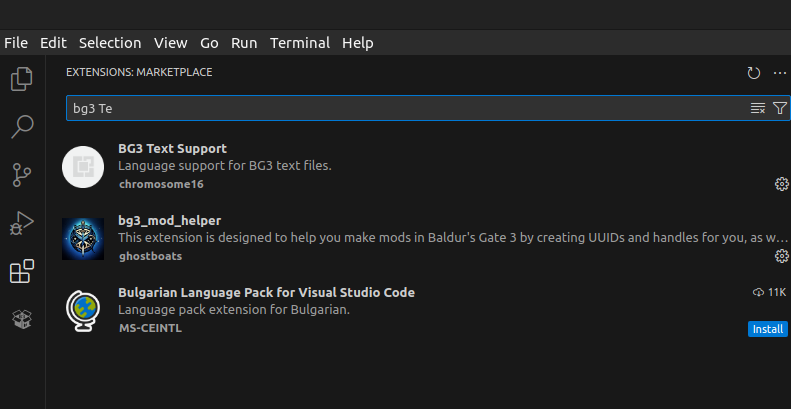
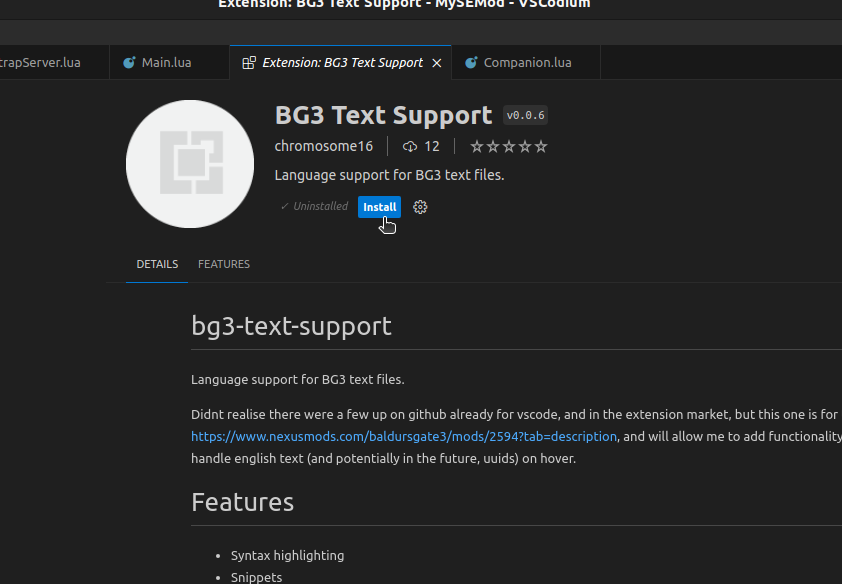
Click on the desired Extension and a new tab will open. Here click install.
Repeat this step for bg3_mod_helper and BG3-SE-Snippets
If you were not able to find BG3-SE-Snippets in the Extensions follow the manual install below:
Visit : https://marketplace.visualstudio.com/items?itemName=FallenStar.bg3-se-snippets
Follow the commands listed under installation. You can also see specific instructions in the next images.
First, copy the text ext install FallenStar.bg3-se-snippets
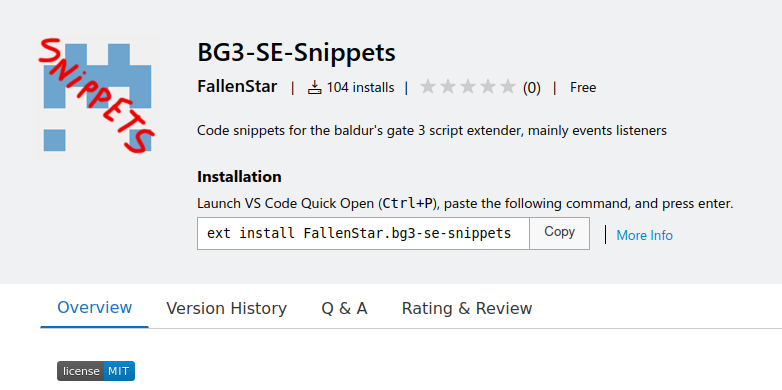
Then open VSCode again and press Ctrl+P
This will open a small search window on the top

paste ext install FallenStar.bg3-se-snippets into this field and press enter.
This will automatically install this extension.

If you use VSCodium instead of VSCode you will have to manually install this extension
¶ 3.3 Adding your first line
Now navigate back to your explorer by clicking Explorer.
You will find a few files here already.
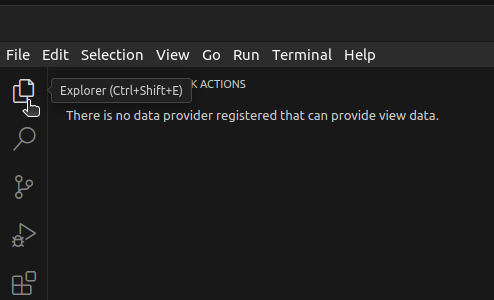
Navigate to to BootstrapServer.lua
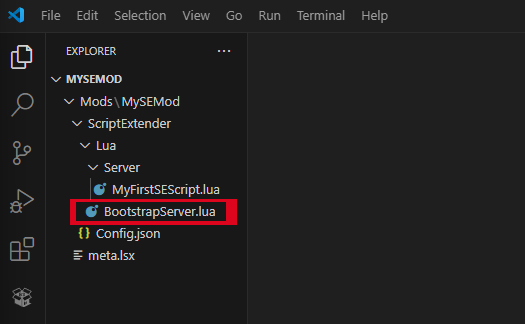
To test if your mod is active in the game, temporarily add a print statement that will execute when the game loads.

Adding this print statement causes Script Extender to execute it upon loading the game, letting us know if the mod is active.
¶ 3.4 Packing your mod
Afterwards, Pak the mod with a tool of your choice.
- LsLib: https://github.com/Norbyte/lslib/releases
- Modder’s Multitool: https://github.com/ShinyHobo/BG3-Modders-Multitool/releases
Here we will use lslib. The packing tool is called ConverterApp.exe
Navigate to the correct tab PAK/LSV Tools
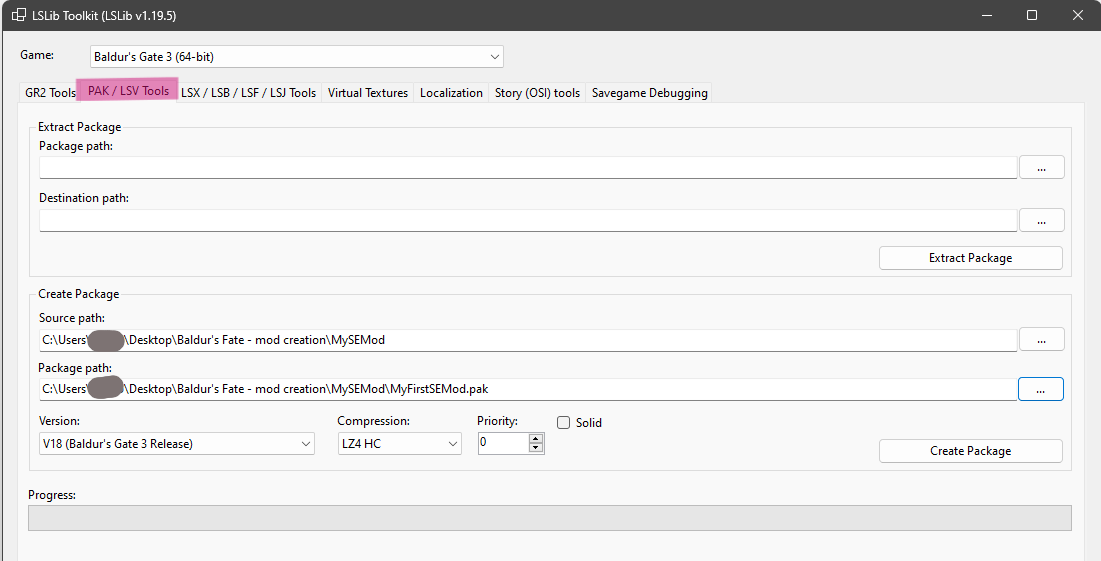
Pak the folder with a tool of your choice in the sections Create Package
Add the generated .pak file to your Mods folder and acitvate it and save the load order with your mod manager.
When you see your print statement on game startup, you have successfully loaded your mod.

If you are not able to see this statement, you likely missed one of the steps.
¶ 4. Symlinking
If you want to symlink your mod, don’t have a .pak version if it in your Mods.
As of patch 7 symlinked mods have to be activated and exported in BG3MM to be recognised.
Every time you make a change to your mod, you have to exit the game, repack your mod, and launch the game again to see the effect.
Symlinking is optional, although highly recommended, as it allows you conveniently avoid the aforementioned steps and hot reload your mod.
If this sounds too complicated, you can also move your workspace into the
Modsfolder inData.
For this follow 4.2. Alternative to symlinking: Move your project to the Mods folder
¶ 4.1. Setting up the Symlink (With a tool - Recommended for beginners)
Use Link Shell Extension to simply create symlinks with the click of a button.
Check out their instructions here
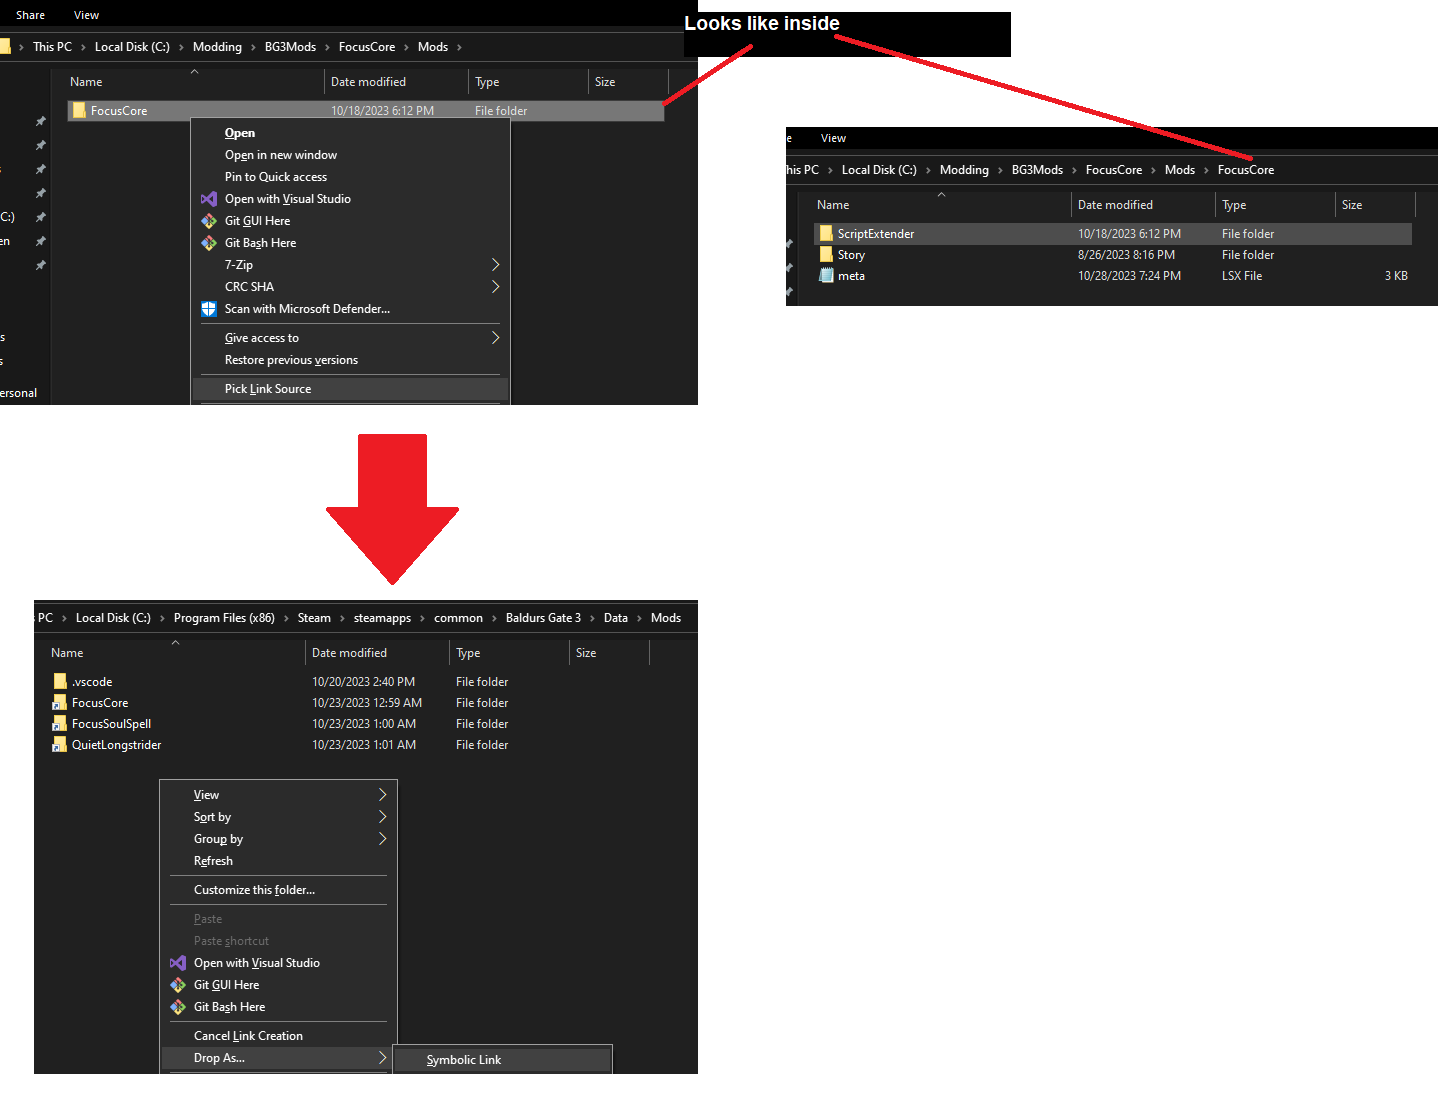
¶ 4.2. Setting up the Symlink (Manual - For advanced windows users)
The following instructions are for Windows. On Linux, simply use ln -s <workspace> <game files>
Due to wiki formatting, the commands had to be divided in separate lines.
When you input the commands, please make sure to write all in one line.
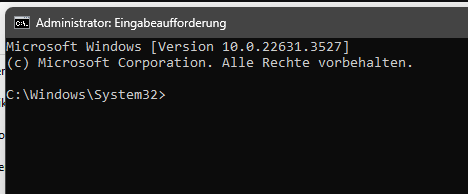
This command is executed in the windows terminal. Type cmd in the search bar and execute the program as administarator
Type cmd in the windows search bar and execute the program as administrator
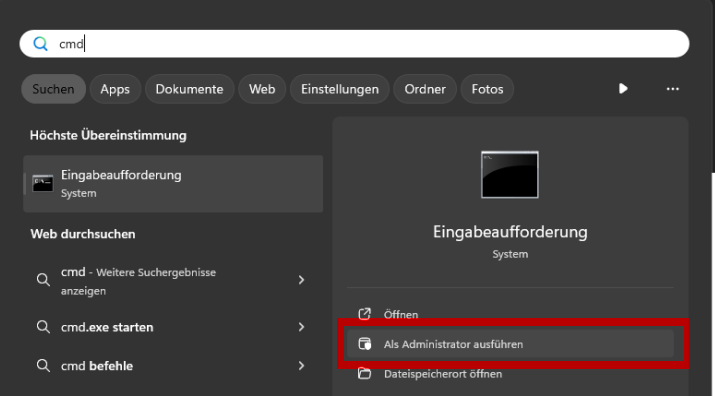
Your console should open. This is where you will type your commands
Using
cmdin administrator mode allows a lot of control over your system.
Only execute commands here when you are certain about what they will do.
The commands for copying are found in the code block below. Please make sure to modify the commands, accordingly to your username, and direction of your workspace as well as your game.
A text editor like Notepad is recommended to do this.
The folders Mods, Public and Localization do not exist in a Vanilla game. They will be created by the symlink.
If they already exist because you installed loose files mods, please delete them first, else the command will throw an error.
// Public folder
mklink /D "C:\Program Files (x86)\Steam\steamapps\common\Baldurs Gate 3\Data\Public"
"C:\Users\YourUsername\path\to\YourModName\Public"

// For code
mklink /D "C:\Program Files (x86)\Steam\steamapps\common\Baldurs Gate 3\Data\Mods"
"C:\Users\YourUserName\path\to\YourModName\Mods"

// Loca
mklink /D "C:\Program Files (x86)\Steam\steamapps\common\Baldurs Gate 3\Data\Localization\English\yourLoca.loca"
"C:\Users\YourUserName\path\to\YourModName\English\YourLoca.loca"
Still stuck? Here are some other resources that explain this step differently
Tutorial for Symlinking & Mass File Conversion for hot-testing your mods
To delete the symlink simply delete the linked folder in
\Steam\steamapps\common\Baldurs Gate 3\Data
An automated way of setting up your symlink might be provided in the future
¶ 4.3. Alternative to symlinking: Move your project to the Mods folder
You can also move your project to the Mods folder in Data instead if you were not able to symlink your folders.
C:\SteamLibrary\steamapps\common\Baldurs Gate 3\Data\Mods\MySEMod
in the example below, where you can see the full path to the script it is:
D:\SteamLibrary\steamapps\common\Baldurs Gate 3\Data\Mods\CBR_Hugs

Note that this symlink is for your scripts. If you want to include .loca or .txt / .gr2 files
They need to be placed in aLocalizationandPublicfolder respectively.
For this follow the guide How to install manual/loose file mods
¶ 4.4. Verifying the symlink
To verify whether the symlink has been created in the correct space, click your newly created symlink
in Data. This should lead you to your workspace folder.
If you see an error instead or a link to a subfolder, please repeat the steps in 4. Symlinking and make sure your paths are correct.
¶ 4.5. Testing the symlink
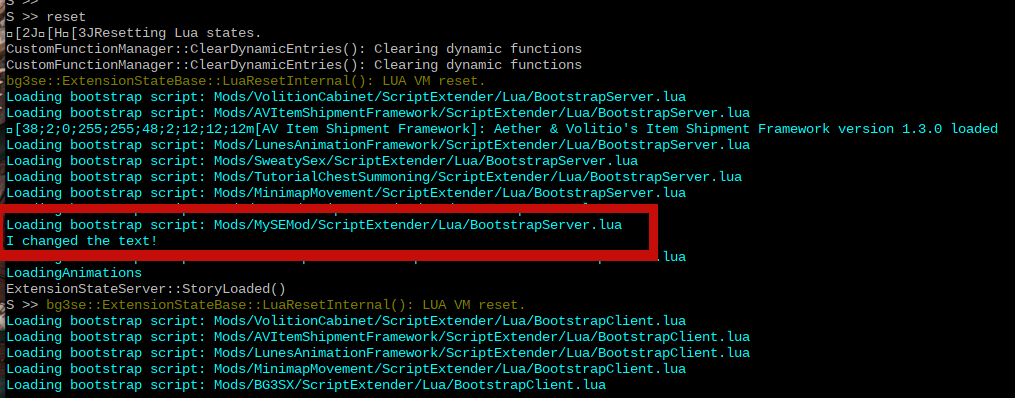
To test whether your symlink has been succesfully created, you can change the print line we have created earlier while having a save loaded.
Change it to something else so you can recognize the change

Then, after activating your SE console again, type reset in the console and press enter
You can only utilize the reset statement if you either symlinked your folder or moved it into
Data
Else you need to repack your Mod so see changes.

This will reset the console and all loaded scripts, allowing you to see instant changes of your code.
Depending on your code, some changes will only apply when the Game session is loaded
In that case simply reload the game (F8)
It has been reported that Modders Multitool might get stuck during the indexing step
in case symlinked folders are present.
If this is an issue for you, simply remove the symlink and create it again after the indexing is done.
¶ 5. Creating multiple files
Whether you created a symlink or not, you can create multiple files in your workspace
to help break down your project and for easier navigation.
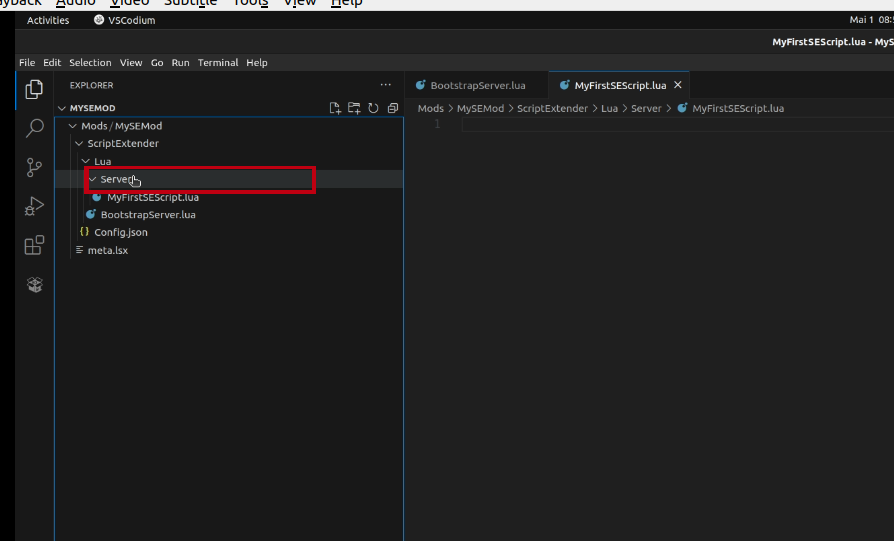
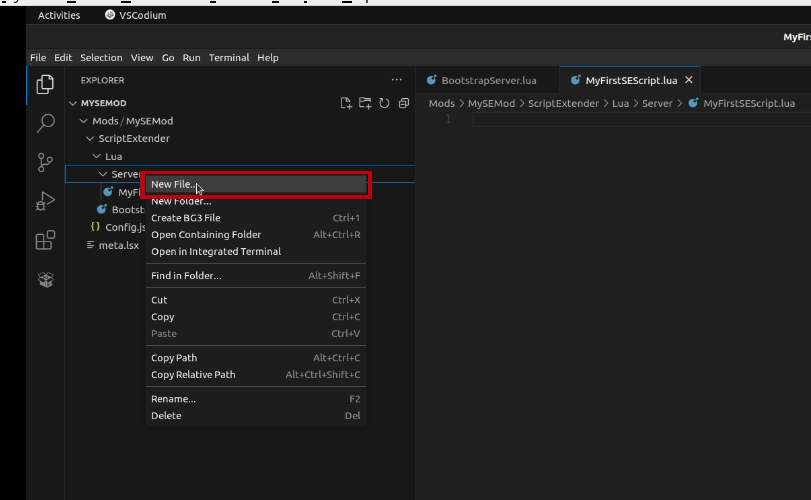
Let us create a new file by right clicking on the folder “Server” and clicking “New File”.
We will name this file MySecondSEScript.lua.
Step 1: Right click on “Server”
Step 2: Click “New File”
Step 3: Enter the name MySecondSEScript.lua
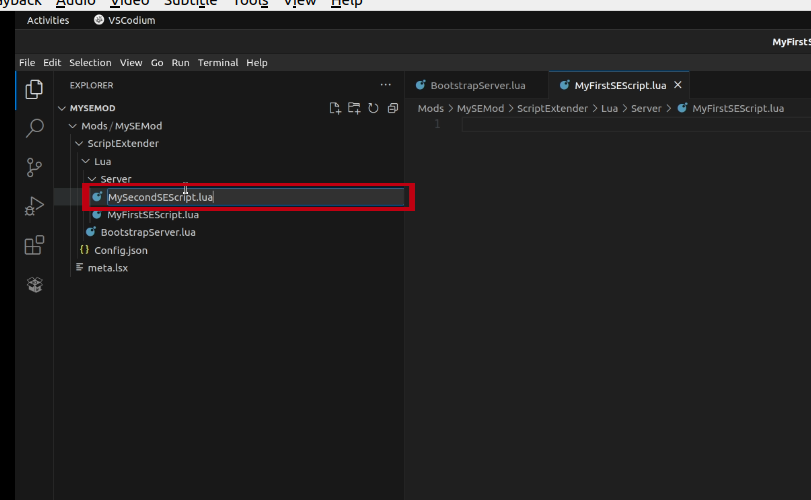
All Lua scripts you want to create need to have the ending .lua
Step 4: Add the new file to BootstrapServer.lua by adding the line
Ext.Require("Server/MySecondSEScript.lua")
Only by adding this line will SE know to load the new file. Else it will be ignored.
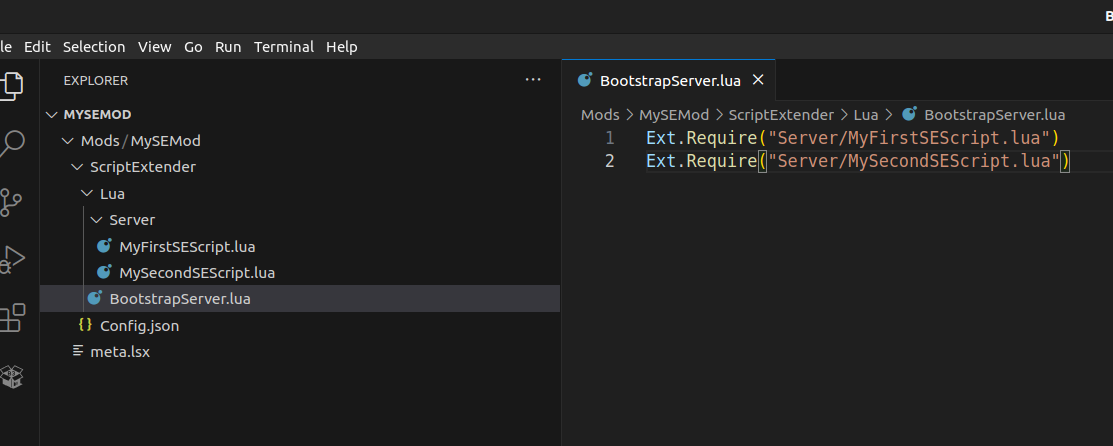
If you do not add your new file to the BootstrapServer.lua it and its contents will not be recognized
Step 5: Enter some print statements to make sure you can see the difference

Step 6: reset the console to see the difference

You can only utilize the reset statement if you either symlinked your folder or moved it into
Data
Else you need to repack your Mod so see changes.
¶ 6. Osiris
The following section assumes that you have some basic programming and
Luaknowledge
If you do no, please follow The Basics of Lua
Experienced programmers might still benefit from it as well since it introduces a fewLuaquirks
Osiris is a programming language used by Larian Studios.[1]. Using Norbyte’s Script Extender we can interact with Baldur’s Gate 3 and manipulate it in a tremendous manner.[2]. Here we will have a look at a few simple examples. Specifically Osi.lua[3] and Osi.Events[4] provided by LaughingLeader[5]. There are many more functions, but here we focus on the basics.
¶ 6.1. Functions
Here we will introduce a few functions from LaughingLeaders Osi.lua file. We will go over how wo call the functions and how to use their output.
¶ 6.1.1. Osi.GetHostCharacter()
Here we will introduce one of the most important functions for testing.
Osi.GetHostCharacter() will return the UUID of the currently selected character
---@return CHARACTER character
function Osi.GetHostCharacter() end
Here it is being called while Astarion is selected.
Since it returns a UUID we want to dump the return value with _D so we can see the output.
_D(Osi.GetHostCharacter())
"c7c13742-bacd-460a-8f65-f864fe41f255"
¶ 6.1.2. Osi.AddGold()
Our next example will be adding gold to a character
---@param inventoryHolder GUIDSTRING
---@param amount integer
function Osi.AddGold(inventoryHolder, amount) end
Here we can use Osi.GetHostCharacter for the inventoryHolder since we know that it returns a UUID.
For the second argument we need an integer , that is a non-decimal number.
Osi.AddGold(Osi.GetHostCharacter(), 999)


¶ 6.1.3. Osi.GetApprovalRating()
We can not only execute functions that lead to changes in the game, we can also use them to get information.
---@param ratingOwner CHARACTER
---@param ratedCharacter CHARACTER
---@return integer rating
function Osi.GetApprovalRating(ratingOwner, ratedCharacter) end
Here we will select out Tav so they will be the host character for the ratedCharacter.
For the ratingOwner we will choose Astarion. His UUID is "S_Player_Astarion_c7c13742-bacd-460a-8f65-f864fe41f255"
Since here we Get a value we want to dump it again to see the output.
_D(Osi.GetApprovalRating("S_Player_Astarion_c7c13742-bacd-460a-8f65-f864fe41f255", Osi.GetHostCharacter()))
1 (standard approval)
¶ 6.1.4. Osi.UseSpell()
We can also do more proactive actions with these functions.
Here we will cast a spell.
---@overload fun(caster:GUIDSTRING, spellID:string, target:GUIDSTRING)
---@param caster GUIDSTRING
---@param spellID string
---@param target GUIDSTRING
---@param target2 GUIDSTRING
function Osi.UseSpell(caster, spellID, target, target2) end
This function can be overloaded. This means that we can execute it with another set of parameters than listed. We can either use caster, spellID, target, target2 or caster, spellID, target.
We are only interested in hitting one target right now so we will use the second option.
We will use our Tav to hit Astarion with Eldritch Blast
Osi.UseSpell(Osi.GetHostCharacter(), "Projectile_EldritchBlast" , "S_Player_Astarion_c7c13742-bacd-460a-8f65-f864fe41f255")
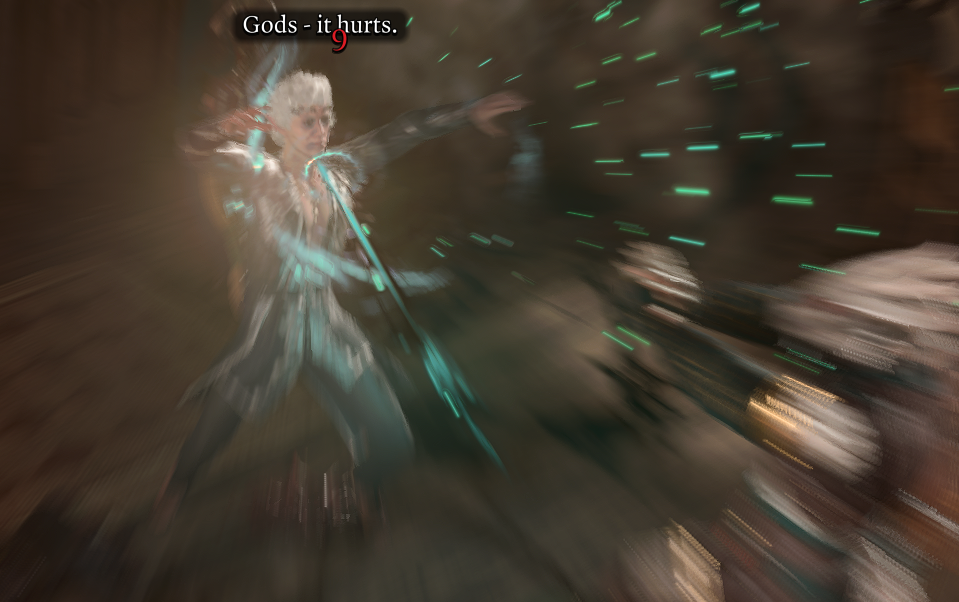
Want to try out more spells? Use https://bg3.norbyte.dev/search?q=type%3Aspell
to look up their names
¶ 6.2. Events and Listeners
Authors’s note: This guide is still a work in progress. Please see 9. Useful Resources for more information
Work in Progress. For now refer to Osi Events: https://github.com/LaughingLeader/BG3ModdingTools/blob/master/generated/Osi.Events.lua
Work in Progress. For now refer to SE API Documentation: https://github.com/Norbyte/bg3se/blob/main/Docs/API.md
For more interactivity we can use Listeners. If you followed 3.2 Installing Extensions then you should have BG3-SE-Snippets installed. This will allow you to autocomplete listeners. Else you can build them yourself.
¶ 7. Script Extender Functions
Work in Progress. For now refer to SE IDE Helpers: https://github.com/Norbyte/bg3se/blob/main/BG3Extender/IdeHelpers/ExtIdeHelpers.lua
// TODO
- Dumping
- Basically go over the API and heavily credit it
- List some useful Ext functions, like _D(Ext.Entity.Get(GetHostCharacter()).CharacterCreationAppearance) - maybe even in a separate wiki page
- DB_Avatars, _D(Osi.DB_Players:Get(nil))
- Ext Listeners
- link to imgui page here
// TODO: Explain : and . (Calling the function with itself as the first parameter) -> Maybe something for 8. Using Script Extender Functions instead? Might fit in the metables section
https://discord.com/channels/98922182746329088/1228009824017453147 (ask for permission to post - original author is not clear)
¶ 8. Advanced Information
- IMGUI / Devel stuff?
Done reading?
Create your first SE Mod with me [TBA]
¶ 9. Useful Resources
Norbyte
Norbytes search engine: https://bg3.norbyte.dev/
Script Extender: https://github.com/Norbyte/bg3se/tree/main
SE API Documentation: https://github.com/Norbyte/bg3se/blob/main/Docs/API.md
SE IDE Helpers: https://github.com/Norbyte/bg3se/blob/main/BG3Extender/IdeHelpers/ExtIdeHelpers.lua
LsLib: https://github.com/Norbyte/lslib
FallenStar
FallenStar’s VSCode extension: https://marketplace.visualstudio.com/items?itemName=FallenStar.bg3-se-snippets
LaughingLeader
BG3MM: https://github.com/LaughingLeader/BG3ModManager
Osi functions: https://github.com/LaughingLeader/BG3ModdingTools/blob/master/generated/Osi.lua
Osi Events: https://github.com/LaughingLeader/BG3ModdingTools/blob/master/generated/Osi.Events.lua
Larian Studios
Osiris: https://docs.larian.game/Osiris
DBTR Discord
Me
Utils file:
Credits:
Alithea Ancunín for proofreading
Cerberry for screenshots, ideas and feedback
Chip Chocolate, Legendary Muffin for a multitude of resources and his knowledge
ImmortalRD, Schroedingercat and Chip Chocolate, Legendary Muffin for the tutorial for Symlinking & Mass File Conversion for hot-testing your mods
Padme4000 for reporting the conflict between MMT and symlinks
simosas for his millions of useful functions and good company.
Skiz for bravely enduring and suffering through this journey with me
BG3 Modding Community Discord for answering my questions
¶ References
[1] Osiris: A scripting language by Larian https://docs.larian.game/Osiris_Overview
[2] Norbyte’s Script Extender: An API that allows Lua/Osiris scripting for Baldur’s gate 3 https://github.com/Norbyte/bg3se
[3] Osi.lua: Osiris calls provided by LaughingLeader https://github.com/LaughingLeader/BG3ModdingTools/blob/master/generated/Osi.lua
[4] Osi.Events: Osiris events provided by LaughingLeader https://github.com/LaughingLeader/BG3ModdingTools/blob/master/generated/Osi.Events.lua
[5] LaughingLeader: Github link https://github.com/LaughingLeader