¶ BG3 Mod Helper - A VSCod(e/ium) Extension
Created by ghostboats and khbsd, this VSCod(e/ium) extension is designed to help mod authors speed up their mod creation workflows. The extension has multiple useful utilities that include but are not limited to:
- Mod Packing/Unpacking
- UUID/Handle Generation
- UUID Mapping
- Handle Management
- LSX/XML/LOCA/ETC File Conversions
- Generate Mod Templates
- And More!
If all of this sounds gouda, and you are comfortable with initial setup and just want to see what the extension can do, please jump to here while we cover the basics.
Although the extension is still receiving regular updates, it’s very functional, and has lots of tools and tricks useful to mod authors. It is built off the philosophy of “Few clicks, few tabs” ie, being able to mod without having to tab out as often and requiring as few clicks as possible to get the job done. It has saved us a lot of time, and I hope it can do the same for you!
While I use “VSCode” in this article, it is in the marketplace for both VSCode and VSCodium
Goal: The goal of this wiki is twofold: provide documentation for mod authors and developers (coming soon) who may wish to contribute/fork their own version.
¶ Table of Contents
¶ File Locations
¶ Requirements
Note: Previous versions of the extension required direct use of
divine.exe. This has since been replaced with LSLib. Make sure your path now points to the directory containinglslib. Likewise, previous versions of the extension required python and some external modules (ImageMagick, PIL, etc). This has been removed and only thelslibfolder is required.
¶ Mod Authors Guide
¶ Limitations
Nothing is perfect, let’s get the rough stuff out of the way before we start, to possibly save you time in case this extension is not what you are looking for.
- Unable to work with multiple workspaces in one VSCode window
- Unable to edit png and dds files in VSCode (can resize, convert, generate atlas texture, and apply backgrounds to transparent pngs though)
- Buggy when having other folders within your workspace
- Buggy when using multiple VSCode windows (need to confirm)
- Possible lag due to folder/file size (need to confirm)
- No references to base game uuids/handles (coming soon?)
Being on this list doesn’t guarantee that it will or will not be possible in the future. Just that it is unlikely.
¶ Download Guide
There are several ways to download the extension, but below is the easiest method.
- Open VS Code
- Click on the
Viewtab on the top ribbon - Click on
Extensions - In the
Search Extensions in Marketplacesearch box, enterbg3 - Click
Installon the correct extension (bg3_mod_helper)

It is recommended that you restart VSCode after installing. In fact, you should restart VSCode everytime you change your workspace.
¶ Getting Started
After installing the extension, you will see a message like this:

or this:

in the bottom right of VSCode, especially if this is your first time using the extension.
There are a few quick setup steps that the extension requires to be in a working state, namely adjusting the paths in the extension’s settings. I cover that below, but first let’s get a proper workspace set up so you can utilize all the features of the extension. Once installed, the extension is designed to launch right when you start VSCode.
While the extension doesn’t perform any actions in the background, it is technically always on. This shouldn’t hinder your other non-modding projects, but it’s good practice to disable or delete any extension if you don’t plan on using it for a while.
The key working with the extension is setting up a workspace. There are a few different ways to do it but here is the simplest and safest.
- Optional but recommended: close all other VSCode windows.
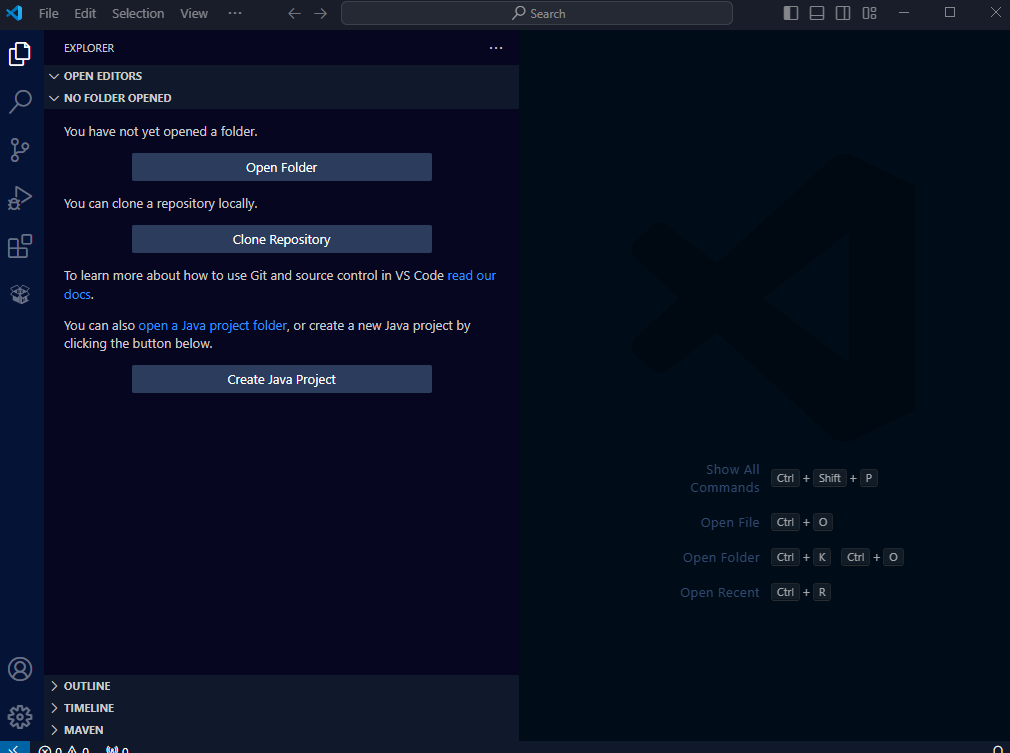
- Open a new VSCode window and make sure no previous workspace is open. Your explorer tab should have options like this picture. You will need to press
Open Folder.

- The extension is designed to have what would be the “Shared” folder as your mods workspace. So when you select
Open Folder, you should select the folder that contains your Localization, Mods, and Public folder as your workspace folder. You should see the message below if you have opened up your workspace correctly (and have your settings set up which I cover in the section below)

VSCODE QUICK TIP: In Windows, you can pin VSCode to your taskbar and simply right click on it. This will give you the option to open previously opened workspaces right away or open an empty workspace. Also, it is possible to add an
Open with Codeoption when right clicking a folder on your desktop (or anywhere) to instantly open and add a folder to VSCode. It’s useful to learn these methods should you swap between mod folders a lot. More info and possible steps here.
¶ Setup Extension Settings
As I mentioned, you better have been listening, if it’s your first time starting the extension (or if you have an error on startup which could be unrelated) you may see the image below when you open up VSCode or a workspace.
This error means LSLib.dll isn’t in the folder in your settings.

This error means there’s something wrong with your Root Mod Path.

There are a few quick setup steps that the extension requires to be in a working state, namely adjusting the paths in the extension’s settings. There are a few ways to get to these settings, with the following being the easiest:
- Click on “File” in the top ribbon in VSCode
- Click on “Preferences” and then “Settings”
- Search for
bg3in the settings search bar
You should be seeing something like this (settings seem to move around):

Before we actually look at any of the settings we need to understand the difference between User settings and Workspace settings in VSCode. In the picture above, we can see options for User and Workspace. User settings persist across multiple VSCode windows. Workspace settings are for that specific VSCode window. This distinction is important because of how the extension handles paths for you. Things will make more sense as you go though each setting option below, but understanding this distinction is important, especially for Root Mod Path.
Let’s go through each settings option.
- Auto Launch On Pack: Toggle this setting to do exactly as the name implies. If you pack your mod with the extension while this is toggled, your game will launch upon packing (disabled at the moment, just hit launch game in data provider).
- Excluded Files: Enter in full paths to files that you wish to not have converted when the mod is packed. This is done to avoid creation of non essential files. These files wont affect your work but do clutter up your space so adding them to excluded can be valuable to avoid the clutter. The fastest way to add an item to the list is to simply right click on a file in your file tree in VSCode and select the new menu option added by the extension which says “Add to Conversion Exclusion List”. At the moment, the entered path is very specific. Ensure a lowercase drive letter and use /. ie c:/Users/ghostboats/Desktop/Squire/Public/Squire/ClassDescriptions/ClassDescriptions.lsx
Certain files/folders are automatically excluded, like meta.lsx
- Hover: Enabled: Toggle this to turn the uuid/handle hover information (users say it can be too much and obstruct the page, an alternative solution would be below)
- Hover: Max Files: Enter a number into the field to limit the amount of entries returns when looking for uuid/handles to display via hover, for visibility.
- Hover: Show Path: Not working and will probably be removed in future, dont worry about this. Probably leave it checked but it shouldnt do anything.
- Launch Continue Game: Toggling this does exactly as stated, launches the game with the
-continueGameflag; it will auto load your last save when it gets to the maine menu. - Lslib Path: Previously this setting was for supplying the path to divine.exe. The extension has since grown and can leverage lslib directly. You will need to supply the path to your lslib. Typically this will be something like this:
C:\Users\ghostboats\Desktop\ExportTool-v1.19.5\Packed. - Max Cache Size: Integer value field. Caching is used to reduce lag and stop hover information from re-searching when hovering over already hovered uuids/handles which makes its position in the hover box shift around and hard to read. Typically you wont need to adjust this setting.
- Mod Destination Path: This field is for supplying the path to the Mods folder for baulder gate 3. When you pack your mod with the extension, it will get set to this folder so you want to point it straigh to the mods folder for the game. For most people this will typically be C:/Users/{username}/AppData/Local/Larian Studios/Baldur’s Gate 3/Mods, just make sure to replace username with your actual name.
- Root Mod Path: This field is a bit unique. We actually do not want to touch this setting. When we open a folder in VSCode, the extension will automatically populate this field with your current workspace folder. In User settings, it should be blank and you should not enter anything here. If you want to confirm your root mod was correctly auto set, change to the Workspace settings tab and take a look.
- Game Install Location: The path to your
Baldur's Gate 3install folder (C:\Program Files (x86)\Steam\steamapps\common\Baldur’s Gate 3). This is used to launch the game from VSCode.
¶ Features and Usage
¶ 0. The Data Provider
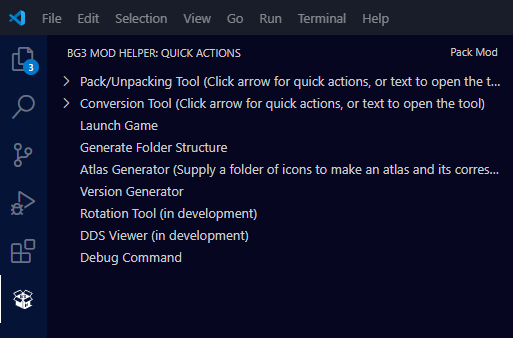
While the extension has many other capabilities and shortcuts, the best way to access the features of the extension is to use the data provider. I’m sure when you first installed the extension, you noticed the little box on the far left (given you havent moved around your VSCode ui). Clicking it opens up the data provider, which is a quick one stop shop for alot of (but not all) the main functionality of the extension.

¶ Some important notes:
If you see a
>before an option, such as Pack/Unpacking Tool, it means that button does multiple things. If you press the text next to it, its main action will be performed, typically open up some sort of webview to work with that tool or process. Your other option would be to hit the>, revealing a dropdown list of quick options you can execute without accessing the more intensive main action.
If you don’t see the cardboard box, you don’t have the extension installed correctly or something is corrupted.
If none of the options are available when you click the data provider (it will say something like nothing to display), something failed when the extension loaded up. It could be a number of things but the first thing to check would be the make sure all the paths you have provided in settings are correct and that you do have lslib downloaded.
I will cover most of what these do below, but here is each current setting and a very quick breakdown of what they are.
- Pack/Unpacking Tool: Allows the user to pack their current workspace mod and unpack mods (duh). Has quick actions only at the moment.
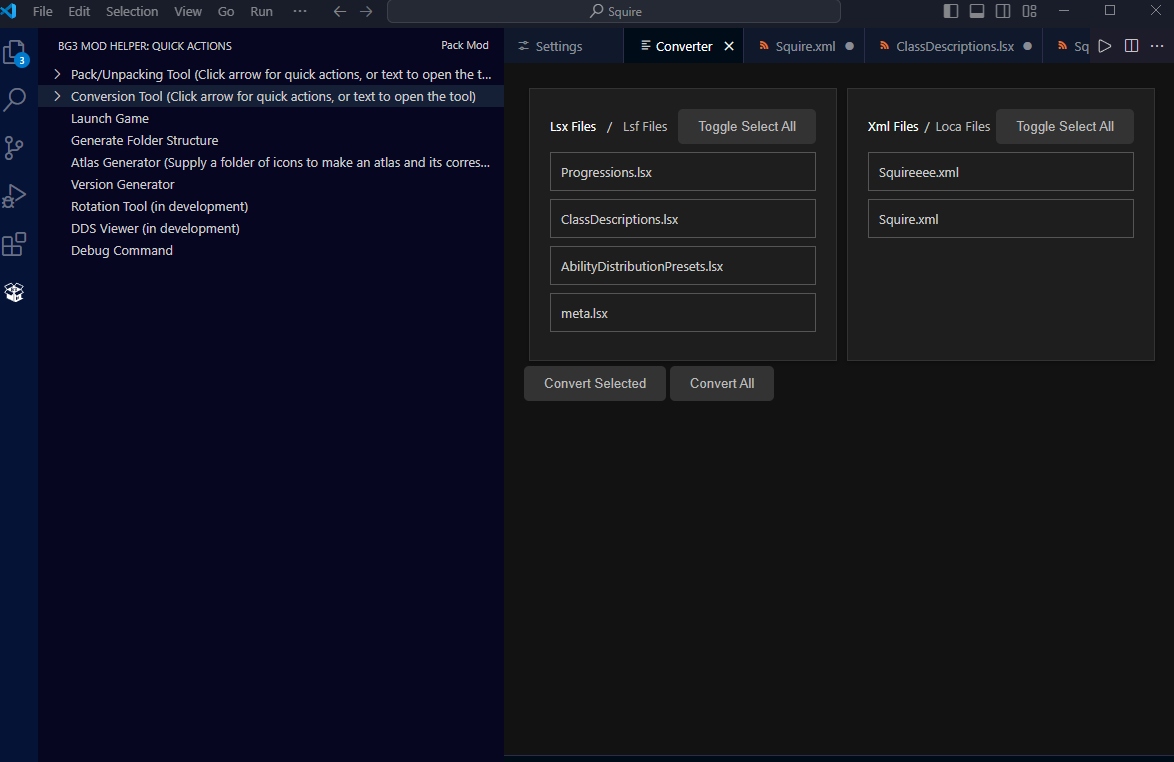
- Conversion Tool: Open a webview tab which allows the user to handle conversion related features regarding lsx and loca files. Has quick actions.
- Launch Game: Launch the game directly from VSCode
- Generate Folder Structure : Lets the user quickly deploy mod templates. Only class mod templates working at the moment.
- Atlas Generator: By supplying a folder of correctly sized PNGs, the user can generate a PNG that can then be right click converted to a dds to use as a atlas texture file.
- Version Generator: Open a webview tab which allows the user to quickly generate a version number for their meta, as well as quickly apply it to your meta file.
- Rotation Tool: Dont worry about this one for now.
- DDS Viewer: In development still but opens a webview that shows information about all the dds files in your workspace. While in development, it only searches for dds files in the
Modsfolder. Please place your dds files in there temporarily if you wish to test and use this tool currently. - Debug Command: “Don’t press this please, I use this for development”- Ghostboats
I hear you saying “reading is annoying!” and “I don’t want to read all this.”
Too bad.
The one thing you should get comfy with, even if youstupidlyunfortunately don’t care about some of the shortcuts and other features, is the data provider. It will always house the most powerful features of the tool and it would be a waste of your time not to use them.
¶ 1. UUID/Handle Creation
- Right-click on an open editor to access the context menu, or press F1 and choose “Generate UUID” or “Generate Handle” to insert a UUID or handle at the cursor’s location.
- If text is selected when generating a UUID or handle, the selected text will be replaced with the generated value. For handles, the selected text will be used as the handle’s context if a local XML files exist.
- All this functionality supports multiple cursors.
- Alternatively you can generate a UUID or handle using the default keystrokes Ctrl+Shift+U and Ctrl+Shift+H, respectively.
- When handles are generated, if an XML file exists, it will add the newly created handle to the XML. Tip: you can easily create one with Create BG3 File. Handle-y!
Use the
Add Handles To All Locassetting to apply the newly created handle to all your loca files should you have multiple. Otherwise, you will be prompted to select which files to insert the handle in.
¶ 2. File Conversions (lsx<>lsf, xml<>loca)
- Open a custom webview tab where users can manage converting lsx, lsf, loca, xml, etc., files. by clicking on
Conversion Toolin the data provider.

- Can also quick convert without the converter tab by clicking the dropdown arrow on
Conversion Toolsto display quick options regarding conversion such asConvert all XML to LOCAorConvert all LSX to LSF. - Single file conversion via right-click menu from file tree.
- Auto-convert files when packing, including an exclusion list managed in the extension’s settings.
Look for
Excluded Filesin the settings to add files to exclude. You can also right click on a file and clickAdd to Conversion Exclusion ListorRemove from Conversion Exclusion List.
¶ 3. Pack/Unpack Mods
- Open a custom webview tab where users can manage packing and unpacking related features (webview in development, quick actions currently working though).
- Can also quickly pack/unpack without the packaging tool by clicking the dropdown arrow on
Pack/Unpacking Toolto display quick options regarding packing such asPack ModandUnpack Mod. Pack Modperforms a number of background checks:
–Ensures a meta exists or prompts you to create one.
–Converts all non excluded .lsx and .xml files for you automatically.
–Moves the newly made .pak to the game’s Mods folder.
–Can autolaunch game after packing if settings are enabled (disabled at the meowment).
Look for
Auto Launch On Packto launch game right away after packing, chains well with theLaunch Continue Gamesetting.
¶ 4. UUID/Handle Hover Information
- Hover over UUIDs/handles in your files to see hoverable boxes which display all your related UUIDs/handles in your workspace. It breaks it down by the following per entry found:
–The entire line the UUID/handle is found on, starting at the first whitespace occurance.
–The file that line is found in. If you click it, it will open the file in the editor at that line for quick access.
Look for
Hover: Enabledin the settings to disable the hover feature of the extension to avoid visual clutter if you see fit. Look forHover: Max Filesfor a better solution as it will limit the amount of files returned to help with visual clarity. Look forMax Cache Sizeif you are dealing with lag issues.
¶ 5. PNG/DDS Manipulation
- Convert PNG files to DDS files (and vice versa) by right clicking on a file in the file tree and selecting
Convert To DDSorConvert To PNG.
–When converting an atlas texture, it will correctly convert the PNG to dds, not DDS - Resize PNG/DDS files by right clicking on a PNG/DDS file and hovering over
Resize Image. Four options will appear:
–Resize Image Customwhich will prompt you to select a height and width (make them the same please)
–Resize Image to Controller (144x144)
–Resize Image to Hotbar (64x64)
–Resize Image to Tooltip (380x380) - If you have a PNG image with a transparent background that you plan to use as an icon in the game, you can add a background to it. Right click on the PNG in the file tree and select
Add Icon Backgroundwhich will prompt you to either choose from multiple in game backgrounds or a custom one if you have one.
¶ 6. Other Actions
- Generate BG3 related template files (ClassDescriptions.lsx, etc) quickly by right clicking in the file tree and clicking
Create BG3 Fileor pressControl + 1which opens a dropdown of file templates to choose from. - Open online export tools (BG3 Search Engine, LSX Validator and Stats Validator) in a VSCode tab. Right click in an open editor to open the context menu, hover over
Export Tools, and select the relevant option. - Hovering over BG3 related functions will provide information on them
–VERY LIMITED WHILE STILL GETTING FUNCTION INFORMATION - Autocomplete for data entries
–VERY VERY LIMITED
¶ Developer’s Guide
Coming soon, you heathens.
